When simply performing an upgrade from one release to the next, your user settings are preserved. However, many users elect to completely uninstall and re-install the new release of the software. In doing so, it’s important to preserve the time and effort invested into customizing your environment, and the Copy Settings Wizard is perfect for just that. Likewise, the Copy Settings Wizard can be used when upgrading to a new computer, or sharing common settings, such as file locations with other users in your organization.


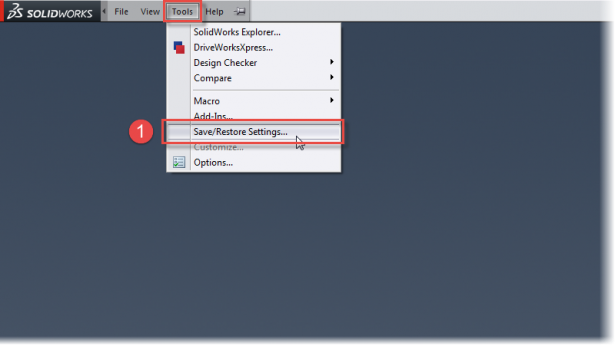
First, you need to launch the Copy Settings Wizard. This can be found in one of two places (above). (1) The first is from within SOLIDWORKS itself from the Tool menu pull down; the second is from the Start Menu in Windows. When you select this it will launch the Copy Settings Wizard dialog box (below).

The next thing you need to do is choose to either (2) Save or Restore your settings. In this case, because we want to backup our current settings, we will choose Save Settings. Then press next at the bottom of the dialog box.

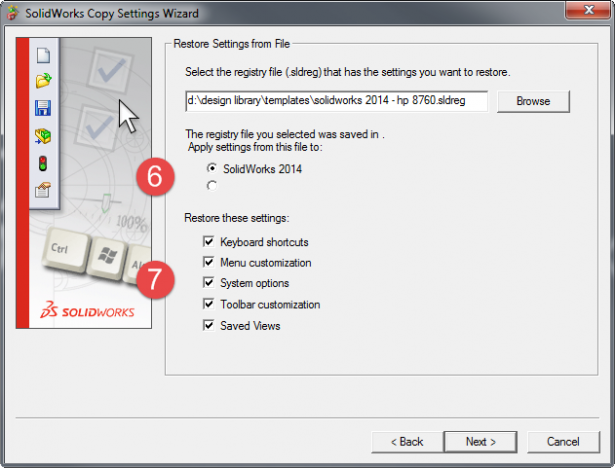
The next window you need to first specify where you would like to save the Settings File (3). Here is also where you can choose exactly which setting to save (4). There are several choices here, and the same options are available when restoring settings as well; I usually choose to save all the settings for that reason. However, if you don’t want to share certain settings; in the case where you want to share your settings file with other users, you can selectively choose which settings to save. The settings choices are
- Keyboard Shortcuts – These include any hotkeys you have customized in SOLIDWORKS, for all environments
- Menu Customization – This includes any menu changes you’ve made, such as hidden and shown items in the case of the Right Mouse Click Menus
- System Options – This is probably the most important of all the options here. This will preserve all the System options that you’ve defined to control things such as display, performance, backup, etc. The most important of all these options is the File Locations Settings.
- Toolbar Layout – These settings include not only the location of every toolbar and the Command Manager in SOLIDWORKS, but also any changes you’ve made to them such as adding or removing specific Command Buttons. Likewise, you can selectively choose to only include the Macro Toolbar, which you can customize with your own macros.
- Saved Views – The Saved Views are created whenever you define a Saved View in SOLIDWORKS using the View Orientation Pop up. You can save those for reuse later. These are especially valuable if you’ve create variants of the standard Isometric View for Back, Bottom, Right and Left combinations.
 Once you’ve decided which options to save and the location, choose Finish at the Bottom. That’s it, all the settings you want to save are now Saved in a *.sldreg file (5). At this point you can share the file you’ve created with your colleagues or begin the process of upgrading (either software or a new computer). The file you’ve created (5) is also the best way to Restore any of your saved settings by simply double clicking on it. You could also begin the Restore Process by starting the Wizard the same way described above. One difference however is if you have multiple versions of SOLIDWORKS installed on your computer. Here you choose which version of SOLIDWORKS (6) to Restore the saved settings to. Next the process is very similar to saving your settings, in that you can selectively choose which of the saved settings you would like to restore (see above for a description of each setting). Again, proceed to the next step by pressing Next at the bottom of the dialog.

The next window display is quite powerful. This is where you can (8) specify which users or computers on your network should receive the saved settings. This is especially useful if you want to share say all of the Network Path locations saved in the File Location Settings. Or perhaps, you want all users to use the Multi-User Environment options. Keep in mind, you shouldn’t attempt to change the settings of other users unless you are, or have the permission from your network administrator as they may manage these with Network Installation tools. For yourself however, feel free to choose Current User, then press Next at the bottom of the dialog.

The last screen you’re presented with is the final confirmation. Here you also have the ability to save a (9) backup of your current settings (also a .sldreg file) before applying the saved settings. I highly recommend choosing this option until you’re comfortable with how the Copy Settings Wizard works. Sometimes, users copy settings they didn’t intend to share, or were specifically chosen based on a particular computer’s performance. However, to finalize or Restore the settings choose (10) Finish at the bottom of the dialog box.

Now when you launch SOLIDWORKS, all of the saved settings you specified will be restored. If this is a new version of SOLIDWORKS, I still recommend reviewing the What’s New Guide to see if there are any changes that might effect your previous configuration. For example, if a new tool is available, these are sometimes added to the appropriate toolbar automatically during installation. However, if you restore your settings from a previous release, this would be overwritten.
Originally posted in the SOLIDWORKS Blog, by Jeremy Regnerus.
