Whether you are working with imported geometry, feature trees longer than the beards from ZZ tops, or even a simple part mode; that just needs to get done, direct editing features in SOLIDWORKS can get you a long way with little effort. This tech tip will focus on the ‘Move Face’ command, which is one of my favorite ‘plows of productivity’ found in the direct editing tool chest.
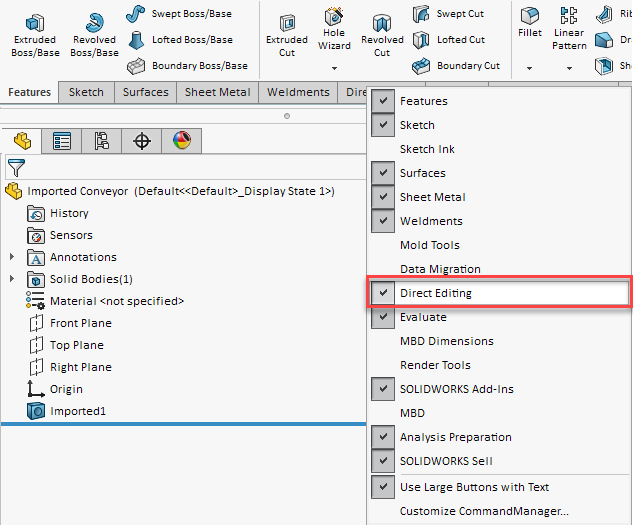
All versions of SOLIDWORKS CAD come equipped with the direct editing commands and can be enabled on the command manger just like our common tools such as sketch, feature, weldments, etc. If you don’t see the ‘Direct Editing’ tools enabled, simply right click on your command manager tabs and select the ‘Direct Editing’ [Figure 1].
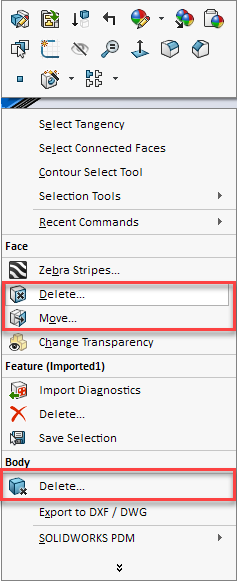
It’s worth noting that you can also access most of the direct editing tools from your right click menu as well. Right clicking on a face of a solid or surface in the graphics area and scrolling down to FACE will show the move and delete face option. Under BODY you will see the Delete body option. I have customized my right click menu to always have these always visible and easily accessible [Figure 2].
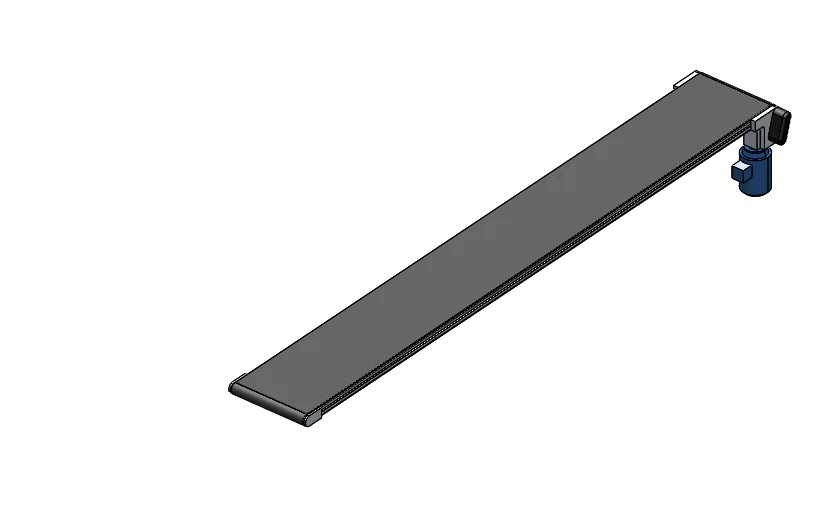
Now that you know where to find the direct editing tools, let’s look at a common examples where these can become extremely helpful when part modeling. Let’s take a look of an imported STEP file downloaded from 3D Content Central of a conveyor belt [Figure 3]. The goal is to create a configuration of a wider and longer variation, a perfect opportunity to directly edit the geometry versus manually creating a series of converted entities and generating extrusions and cuts. You’ll see the direct editing method is fast way to get the desired end result.

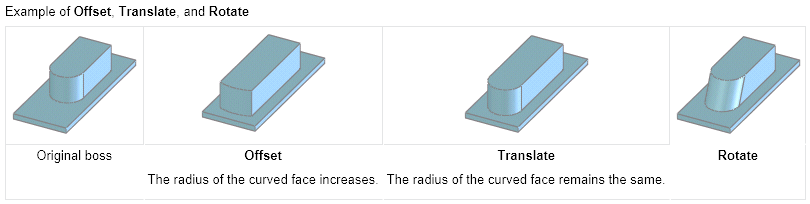
I’ll start by activating the ‘Move Face’ command which allows me to do exactly what it sounds like, move faces of a solid or surface bodies. Simply windows select all of the faces that will be moved, a face filter is automatically applied to grab the correct entities. Notice in the property manager the multiple options: offset, translate and rotate. You can also create end conditions just like in an extruded boss to builds design intent into your direct edit features [Figure 4].

To better understand the differences between the three types of move face, refer to the SOLIDWORKS help file which provides a nice visual graphic of how each effects a selected face of a boss [Figure 5].
I’ve found that generally with multiple faces that have different normal directions, the ‘Translate’ option will most commonly give you the expected results. Using the Translate option on our conveyor, simply pull all of the faces to the desired conveyor width [Figure 6] from the triad or manually input the desired offset distance in the property manager.

It’s quick and easy to repeat the process to extend the length of the belt [Figure 7]. Remember to select any faces that will need to be extended, otherwise you will run into a failed command.

You’ll notice that each of these direct edits becomes a feature in the feature manager tree, which can be rolled back, deleted or suppressed. For this conveyor, the goal was to have a different lengths and widths configured which can be done by suppressing the move face command for the desired configurations. I’ve named the Move Face features to ‘Length’ and ‘Width’ for their respective functions [Figure 8]. Using the Configure Feature command [Figure 9], suppressing/unsuppressing each will create 4 different conveyor configurations in this part from just two simple direct editing commands [Figure 10].

Keep in mind there is some magic going on behind the scenes with surfacing commands to make all this happen. If for some reason your direct edit fails, most likely a surface was created in the process that SOLIDWORKS cannot figure out how to convert back to a solid or connect with other surrounding surfaces to eventually convert back to a solid. Try reducing the faces you are trying to translate to help better understand what might be causing issues.
The ‘Move Face’ command is just one of many examples were direct editing can speed up your workflow in an area that you might not even know where to start. Spend some time with the different types of ‘Move Face’ options in your models to get a feel for their behavior. Once you’re familiar with the ‘Move Face’ command, venture over to the ‘Delete Face’ [Delete and Patch] command to really get your socks blown off!
Originally posted in the SOLIDWORKS Tech Blog.