Tim Feher works as a CGI Leader in the automotive industry. If you’ve not seen his webinar on Automotive Rendering in KeyShot, it’s a must. On his new Facebook page, he has published the first tip of many tips to come, beginning with a critical element to the modeling/rendering workflow–model prep.
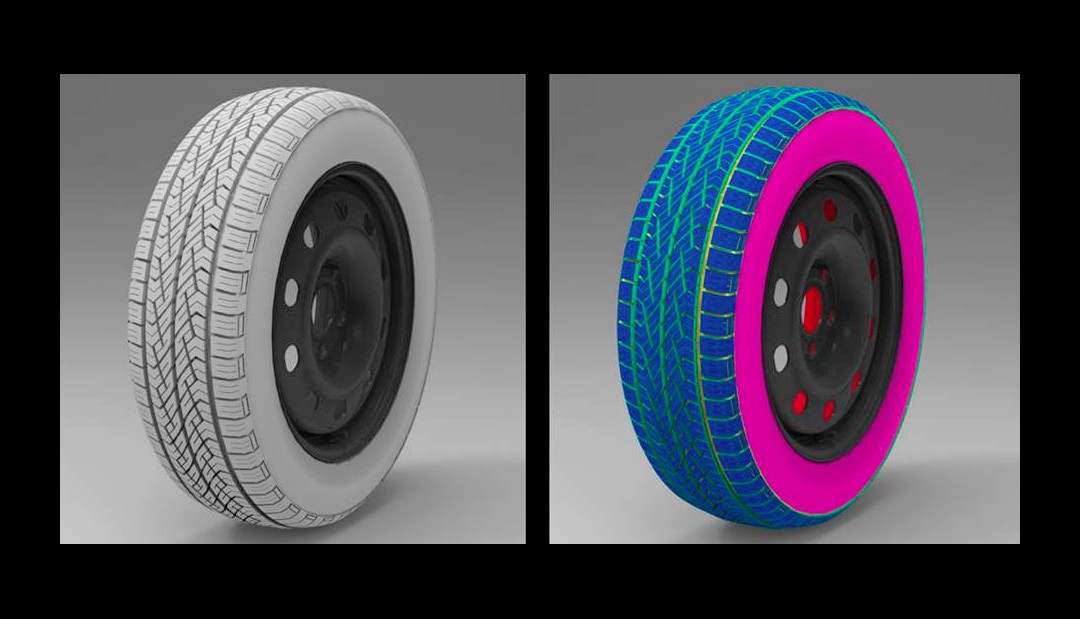
Here is an example of how I would go about prepping a model before importing it into KeyShot. The gray tire and black wheel is how the model typically looks. The tire is one material and the wheel is one material. If I import that into KeyShot as is, I can only change the two corresponding materials–The tire material and the wheel material. So, what do you do when you light the object and, let’s say, you really like how the sidewall shows some nice shape and highlights, but the tread is blown out. If you fix the blown out tread, you may loose the nice sidewall. You would need to render this out twice and combine the two images in post.
I’m a big believer in having the software do the work. So what I do to give myself more freedom with material creation inside KeyShot is to break out the model even more.
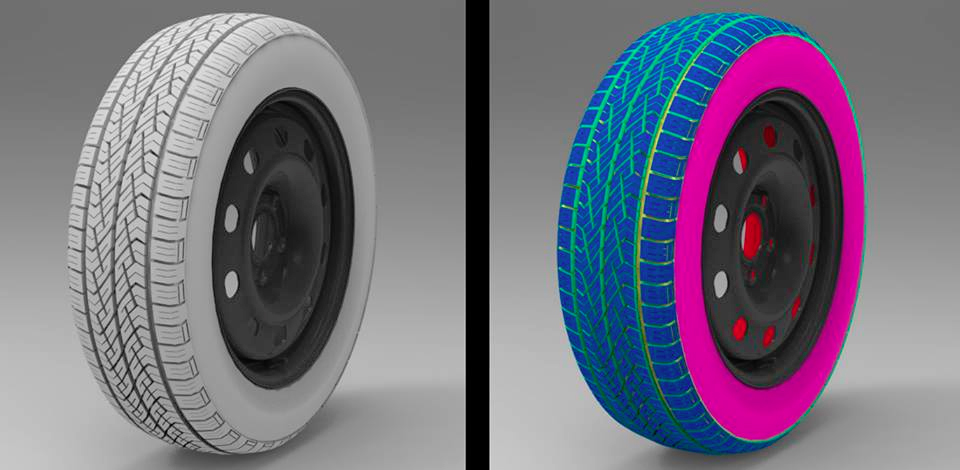
Notice the colored wheel/tire. I have broken them up into six materials. Now, I can control the sidewall separately from the tread. The inner wheel is separated because I like to make the inner wheel material a diffuse material so it doesn’t reflect anything on the outer wheel. This saves time in post by not having to take out hot spots. I am in full control of the wheel and tire now. I’m not limited to the lighting or one material.
What I’m getting at is this: Give yourself more freedom in KeyShot by breaking out your models. Even if you color up all the parts with the same material you will always have the freedom to use the method above. I can’t stress this enough though–Spend time upfront in data prep and your images will become better. Everything starts with the 3D model.
Tim also provides some insight into how to separate the space between the tire tread in Maya:
[The] tread is separated from the side of the tread. That way you can make the tread look like it’s dusted, but keep the grooves darker. In Maya, hide everything but the tread. Select a tread and go into face mode. Now select all the faces. Hold down the shift key and click the less than button. Only the top of the tread should be selected now. Add a material to separate the tread.
Originally posted in the KeyShot Blog
Find out more about KeyShot via our website: http://www.solidapps.co.uk/products/products-keyshot
Buy KeyShot now from our Online Store: http://www.solidapps.co.uk/store/keyshot